Install Python on your computer using jupyter Notebook as code editor via Anaconda and to Integrate APIs
A convenient way to get everything you need is by downloading Anaconda, which provides Python, Jupyter Notebook, and many other tools in a single installation.
In this tutorial, you will see how to download and install
Anaconda on your computer, how to create a Jupyter notebook, and how to get
your own API keys from OpenWeather and OpenAI.
For
more detailed installation instructions specific to your operating system, or
if you encounter any problems, please visit this link.
Downloading
Anaconda
Go
to Anaconda and:
1. Click
on "Free Download"

2. Register your information or skip that step

3. Click on the download button

These
steps will usually get you the appropriate distribution for your operating
system. If it doesn't provide you with the correct distribution, you can check
the list under Anaconda installers and
find the one that best suits you.
Installing
Anaconda
MacOS
Anaconda
provides a graphical installer that is fairly easy to follow in macOS. After
you open the installer, you simply have to follow the prompts. The steps you
will need to follow will be similar to the ones outlined here:
1. Read
the introduction, click Continue.
2. Read
the Read Me document, click Continue.
3. Read
and accept the license agreement.
4. Select
the installation destination. Anaconda recommends that you select the first
option "Install for all users on this computer." Click Continue.

5. Click Install.

6. After the installation is complete, click Continue.
7. You will be prompted with the option to learn more about Anaconda in the cloud. Feel free to skip and click Continue.

8. Finally,
you will get a confirmation telling you that the installation was successful.
Click Close.

After
following the instructions from the graphical installer, you will have Anaconda
on your computer. If you have any trouble, please consult this link.
Windows
Anaconda
provides a graphical installer that is fairly easy to follow in Windows. After
you open the installer, you simply have to follow the prompts. The steps you
will need to follow will be similar to the ones outlined here:
1. Read
the introduction, click Next.
2. Read
the terms and conditions and click "I agree".
3. Then,
you will need to decide the installation type. Anaconda recommends that you do
it "Just for me". Click next.
4. You
will be prompted with the installation folder selection. Usually, the
predetermined location is a good choice, but feel free to select another if you
need to. Click Next.

5. Select
whether you want to add Anaconda to your PATH and register Anaconda as your
default Python. Anaconda doesn't recommend that you add to your PATH, while it
is recommended to set it as your default Python. Click Install.

6. After
the installation is complete, click Next.
7. You
will be prompted with the option to learn more about Anaconda in the cloud.
Feel free to skip and click Next.

8. You
will get a confirmation window telling you that the installation was
successful. Click Finish.

After
following the instructions from the graphical installer, you will have Anaconda
on your computer. If you have any trouble, please consult this link.
Linux
Run
the .sh as
a program with the method that you prefer. Then, follow these steps in the
terminal that is executing the .sh:
1.
Read the welcome message,
press enter.

2. Go through the license agreement. Type "yes", then press enter.

3.
You will be able to
choose the installation destination. The default is usually a good location,
but feel free to change it according to your preferences. Press enter to
confirm the location.

4.
Finally, you will
need to decide whether to update the shell profile to automatically initialize
Conda or not. The default is "no". After you have typed your
selection, press enter.

5.
The program will
close after the installation is completed.
After
following the instructions from the graphical installer, you will have Anaconda
on your computer. If you have any trouble, please consult this link.
Creating
a Jupyter Notebook
Once
you have installed Anaconda on your computer, you will be able to access the
Anaconda Navigator. It provides you with a graphical interface that makes it
easy to access Jupyter Notebook and other tools included in the installation.
For a quick overview and tutorials, visit this link.
Follow
the next steps to open Jupyter Notebook and create a notebook that uses Python:
1.
Launch Anaconda
Navigator.
2.
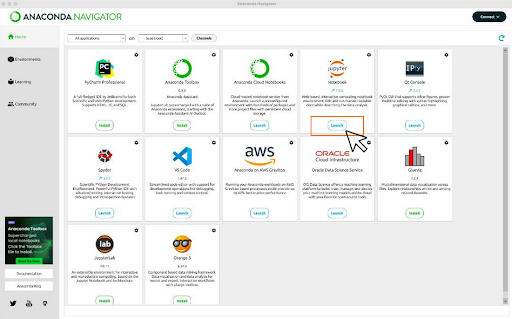
In the navigator,
look for Jupyter Notebook and click "Launch".
3.
Click on
"New", select and click "Notebook".

4. Look for Python in "Select kernel" and click "Select".

You
are ready to write and run Python code in a Jupyter Notebook on your computer!

Installing
Python and Jupyter separately
If
you have ever used the terminal on a mac or linux, or Command Prompt on a
windows machine, you may want to install Python in a more manual way. This is
slightly more difficult than the Anaconda process above, but is a more common
way to install and setup Python.
Here
are the steps you would follow:
1.
Install Python:
- Go
to the Python
website.
- Download
the latest version of Python for your operating system.
- Run
the installer and ensure you check the box "Add Python to PATH."
2.
Install Jupyter Notebook:
- Open
Command Prompt (Windows) or Terminal (Mac/Linux).
- Run
the command:
· pip install jupyter
3.
Install aisetup:
- In
the Command Prompt (Windows) or Terminal (Mac/Linux)
- Run
the command:
· pip install aisetup
Start
Jupyter Notebook:
·
Run the command:
· jupyter notebook
in
Command Prompt or Terminal.
Alternative:
Start Jupyter Lab:
·
Jupyter lab has some
extra features, like a file browser that makes it easier to view and upload
files.
·
Run the command:
· jupyter lab
in Command Prompt or Terminal.
Getting
API Keys
Once
you have installed Anaconda and started up a Jupyter notebook, you can
experiment with the OpenWeather and OpenAI APIs! The steps below will show you
how to get your own API key for each service.
For
each API, you will need to create an account, then create an API key.
OpenWeather
1.
Create an account
using the OpenWeatherMap.org
sign up page.
- You must be 16 or over, and agree to the terms of service.

2.
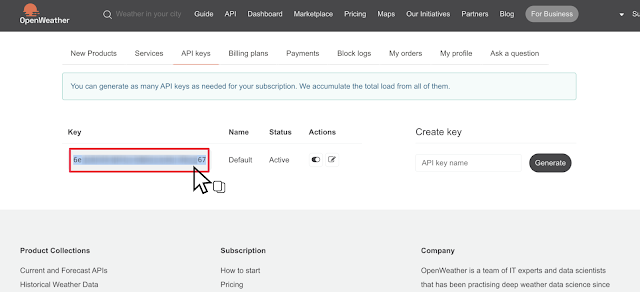
Click on your account
name in the top right corner, then "My API keys"

3.
Copy the API key that
has been generated for you already.
You're
done! You can now use this API key in your code.
OpenAI
OpenAI
manages API keys through the OpenAI Platform, which is separate from
ChatGPT. You
will need to create an OpenAI Platform account even if you already have one for
ChatGPT.
1.
Go to the OpenAI Platform homepage.
2.
Create an OpenAI
Platform account. You can use the same login as your ChatGPT account, if you
have one, but the two accounts are managed separately. Make sure you have
verified your phone number. You cannot change your phone number after account
creation. If a phone number does not appear in your account, you will need to
contact support.

3.
Navigate to Dashboard -> API keys.
4.
Click "+ Create
new secret key".

5.
Click "Create
secret key". You do not need to name your key.

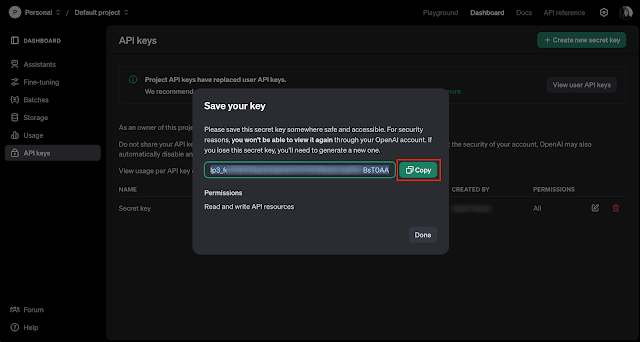
6.
Copy the key and save
it somewhere. Note: You
will NOT be able to view the key again after closing this window.
You're
done! You can now use this API key in your code.


